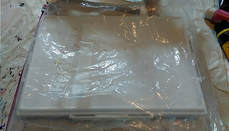
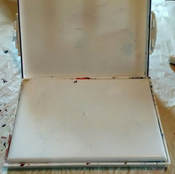
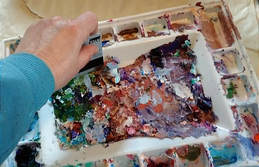
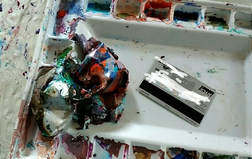
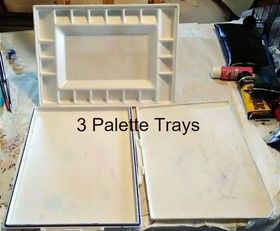
Any palette has its advantages & disadvantages. I used this plastic palette for my latest acrylic painting on canvas. I can’t remember what brand it is. It may still be available at most art supplies stores and the internet. I haven't checked. More details on my latest painting coming soon! Above is an actual photo of how clean the trays looked after about a half hour or less of scraping & peeling off built-up layers of acrylic paint. The following photos illustrate the process of cleaning the palette. You decide how clean you need it to be. I like to remove as much of the tiny bits of dried paint as possible. They’re a real nuisance if they’re left on. They can get mixed into the new paint you squeeze out during your next project. They get picked up by your brush and transferred to the canvas. That’s when you see them as little lumps in an otherwise smooth stroke of paint. You have to dig into it with a fingernail or knife to pull them out. If you leave them there, they can ruin the appearance of your painting. 1) Closed palette inside a large zip-closed bag. I wish it would do better at keeping the paint from drying out overnight. I could have put a damp paper towel in the bag or under the inner tray before closing it. I’ll try that next time. 3) The 2 separate inner units (bottom half as shown here) that are held together by the snap-on lid (top in photo). The center, fitted tray is inverted & seated so that its edges fit inside both the upper and the lower unit when sealed. The lower unit serves as the bottom lid when the whole thing is sealed shut. (All 3 trays were sandwiched together as a single unit before the side flaps were pulled open, enabling the separation of each individual unit.) 4) The dried paint layers that I allowed to accumulate during the entire 2-week time frame when I was creating a painting. The paint layers peel off easier if they’re thicker. That’s one reason I left them there & didn’t peel them off every day. The prior day’s paint was usually too dry to re-use the next day. But sometimes, I was able to re-use it. Leaving it there was also time-saving. I needed to shave off prep time however I could. The 2-week deadline before the painting had to be delivered was shorter than I'm accustomed to working under. But I got it done in time. Whew! 5) After I finished the painting & delivered it, I started on cleaning the palette. I used an old credit card to scrape the paint off the trays. It was easy on the large flat areas. For the paint wells at the sides, I used my fingers & fingernails to peel at the bits of paint that I couldn’t remove by scraping with the credit card. Other tools I’ve used are wooden popsicle sticks, tongue depressors, dull steak or butter knives, or a small piece of credit card cut from a whole one. Again, each has advantages & disadvantages. If the wooden sticks get wet, they bend & break. But they’re less likely to scratch the plastic which you need to avoid doing. I worked on it at the sink. The bulk of the paint debris was disposed of in the waste basket dry. Then occasionally at first, I rinsed with water to get tiny bits of dried paint debris off when scraping wasn't enough. As a general rule, I always keep in mind not rinsing too much paint, especially wet paint - down the sink drain. It could clog the drain and plumbing pipes. It would be a very expensive blunder! 6) How the peeled paint looks after a little scraping with the credit card. An even quicker way to use this palette & avoid putting this much time into cleaning and maintenance involves cutting a piece of palette paper or parchment paper used by bakers to the size of line the inner tray – or both trays if desired. You can purchase palette paper at a craft store or buy parchment paper at most grocery stores. Even better than parchment paper is freezer paper which has a shiny side. It's easier to clean, and more water resistant and durable than parchment paper. Also found in grocery stores. Try searching for it in the plastic bags isle. I know it means generating more paper waste. You have to decide for yourself how much economizing and how important being environmentally conscious is to you. You have to weigh each consideration in terms of the value of your time, how much of it you’re willing to spend on cleaning & prep vs. actual time painting, how far you want to go to conserve resources, and so on. You have to decide what’s right for you. No one else can tell you this. The decision is yours. If you don’t like the idea of consuming lots of paper waste, you might opt not to use paper liners. You’d be throwing them away & replacing them at intervals vs. investing time in cleaning the unlined plastic trays. How often you replace paper liners is up to you also. Every day, or every other day, or whatever works for you. If you’re on a limited budget, the cost of consuming paper liners will be another consideration. In any case, the paint wells along the sides of the middle tray are more challenging to clean. Lining them with paper isn’t a good option. I used my fingers and fingernails to scrape the sides and corners to remove the paint. I didn’t want to put time into hunting down my wooden sticks or my dull knife. I get impatient having to search for things. But also, nothing works for me as efficiently as my own hands. But if I have hand fatigue or don’t want my hands to be soaking wet for such a prolonged period of time, I’ll resort to using the wooden tools or a knife. It requires being extra careful not to put scratches into the plastic which will make gouges that are harder to keep clean in the future. I hope you enjoyed this installment of my story on palette use. Watch for my announcement on my Summer themed painting which will be in an exhibit at Mabee Farms in Rotterdam Junction, NY through July, 2018. Available for purchase.
0 Comments
Your comment will be posted after it is approved.
Leave a Reply. |
Joyce JacksonMultimedia artist in clay, paint, and jewelry. Part-time online bookseller. Archives
November 2018
Categories
All
|