|
I've just created another one of my fantasy mugs. This dreamy ocean fantasy scene will send you to a happy, relaxing place as you sip your favorite beverage. The vivid, blue-green colors harmonize beautifully against splashes of vibrant reds and oranges. The soft, flowing, white swirls of sea water almost merge into the fine layers of the priestess's robe, providing a peaceful background rhythm, like a healing song in 3-D. Here's how to access it. This will take you to my Zazzle store which is not on this website. Before you click below, open a new browser window or a new tab in your current window, and copy this current URL into it to save your place here. http://www.artbyjoycejackson.com/1/post/2012/09/sea-priestess-mug.html In all, there are 3 large panels, all identical reproductions of "Sea Priestess", my watercolor painting on illustration board. Makes for easy viewing from any angle. Customize options are available if you want to personalize the mug.
0 Comments
Sometimes you just don't have enough time to try out new materials in advance. It became so time-consuming to try and figure out how to make a mother mold with Hydrocal FGR 95, that I had to table using it for now. Midway through trying it out, I realized I had completely forgotten that I was going to go the next level and make Forton, not just use straight Hydrocal FGR 95. As it turned out, I'm glad the other Forton ingredients didn't go to waste during this trial period. It was a horrible mess. Splatters of plaster had to cleaned off every nearby surface the next day. It was very difficult trying to get it to stick as I applied it to the castor oil/alcohol coated latex. It starts out very runny. I used hot water to speed up the curing. I added extra Hydrocal to my first bucket so that I'd have a thicker mixture for the initial application. There wasn't much change for a long time, then suddenly there I was rushing to finish applying it when it started to thicken. The thickening, heating up stage is known as "going off'. As it started to thicken, I was able to get globs of it to stick by throwing flicks of plaster at it with a paintbrush. This made a big mess. In retrospect, I needed to have covered my support surfaces with duct tape and petroleum jelly, as Tamar Bonet suggests in her excellent mold making tutorial. For the next layer, I tried to apply the fiber I'm using. When I pressed it against the surface to flatten it, the first layer of plaster broke up in pieces wherever it covered foam-covered latex. Before I could figure out how to work around this new problem, the remaining plaster hardened to unworkable. I could no longer adhere it to the fiber as it hardened. I had to leave it to harden unused in the bucket. I knew I could clean it out of the bucket by leaving it to set up until the next day, then popping out the whole mass after a few firm taps on the bucket. By then, I had used up enough plaster on practicing that I faced another long delay if I decided to order more. It meant waiting for a new bag of it to be shipped to me and further struggles from within the learning curve. I had to come to a decision. It was hard to do it, but I knew I had to take all of the plaster off of the latex before it hardened more and became extremely difficult to remove. I had to hit it with a hammer in one area where it stubbornly refused to pull free. I hope it was due to not enough parting agent there, and not because of undercuts. I have scrutinized it and can't see any undercuts. After the plaster removal, I wiped off all of the castor oil and have washed the surface a few times since. Chips of plaster that still fall onto the latex are being vacuumed off periodically. Mainly, they've been falling off the plastic I use to cover the model. Just when I think I've gotten rid of all the little plaster chips, more of them show up on the latex. Sooner or later, I'll win this fight! :) As soon as I was able, I hurried up and ordered some Plasti-Paste II to use instead of plaster to make the mother mold. While I'm waiting for it to arrive, I need to buy wood for support legs and figure out how I'm going to attach and hold them in place on each mother mold section while the Plasti-Paste II cures. Support legs are a handy feature. They serve as a built-in stand for the whole mold unit when it's in inverted position, ready to receive the casting material. Plasti-Paste II has strong adhesive qualities and will glue the legs in place permanently. I'll need to work out how I'm going to level the mold by adjusting leg heights. Thus when the mold is inverted, it will sit firmly and evenly on all of the legs. There are a few ways to do this. One is done as the legs for each section are added. The idea is to afix a board atop the whole mold unit. The board is leveled according to how the legs will meet the floor. It is supported at the height which will be the space between the legs and the floor when the mold is inverted. One end of each leg is attached to the mother mold. The other end is cut to the length which meets up level with the board's underside. The other approach is to adjust the height of each leg after mother mold making is done. First the legs are adhered in place, each section at a time, but left at uneven heights, and the Plasti-Paste II is allowed to cure. When all mother mold sections are done, a spirit level is used to cut the legs to a uniform height. One artist has successfully used this method on large molds like mine, using a Sawzall to cut the legs.
The Troy, NY Bella Vita Fresco voting is now open to email votes. Please vote! For anyone wishing to vote, you can email your vote to Andrea Daley at [email protected]. You can only vote once. Here’s the info on my Fresco in downtown Troy. Joyce Jackson -Fresco #14 Email your vote by September 8th with the following information: Fresco #: Your name: Email address: Phone #: Indicate whether you would like to get emails on the Bell Vita Fresco Project. Please forward this blog post URL to all your friends & family and ask them to vote. I didn’t do much about getting votes early on. Troy is so far from me, it was difficult and very tiring to continue driving there. I didn’t go there to solicit votes, which other artists who live closer were able to do. Maybe this will boost my numbers a little, up from zero anyway. LOL These contests are never fair, but a good effort was made to make this one fair. Here’s my finished version. The person who took the photo cropped off the entire left side, so it’s hidden. I think it looked better before she cropped it. If I’d been asked permission, I would have said no, don’t crop it. Also it looks more faded than it actually is. It really looks a lot better in real life, but this will have to do. http://www.flickr.com/photos/79188077@N05/7160284800/in/set-72157629640098174 To see more, find out more about the Bella Vita project, Troy, NY. If you want to see mine in person, last I knew it was at Kayla’s Kitchen 39 Hill St., Troy, NY. Thanks for voting!
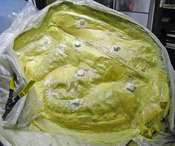
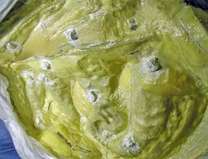
 Final Bump-Outs Layer Here's how the last layer of latex on this section looks. I'll have to start over with the next, hopefully final, mold section on the other side of the dragon after I create a plaster Forton mother mold for this section. It will provide the rigidity needed so that the dragon won't collapse and lose its shape when concrete casting material is packed into the mold. Latex can't do this on its own. It needs this support. It had a rough childhood - in the jungle, no less - and is very insecure.  Bump-Outs Close-up For those of you who haven't already seen enough, here's a close-up featuring the bump-outs, for lack of a better name. They're not quite buttons, but are often referred to as such. However I need to distinguish them in my mind from the concave buttons I already made on the partition wall. I've been calling them "bumps" when I'm by myself. No harm in it. We all need to have our little talks with ourselves now and then where we can use pet names for things and no one can protest. Watch for my new e-book coming out after project's completion to find out what you need to know about making bump-outs. Wet, uncured areas, shown especially around the bumps are white. The color of latex changes to yellowish as it cures. Most people don't find it appealing. That's good! Otherwise, maybe there would be more widespread reports from hospital emergency rooms treating people crazy enough to bake it into brownies and eat it or smoke it outright. The life of artists can get lonely. Can we blame them that in the depth of their despair, they resort to eating and smoking things most people have the sense not to touch? Further discussion of how to speed up curing will appear in my e-book.
The trouble over getting latex to finish the job is over. My new supplier is Dick Blick. The Holden's Latex trouble was a blessing in disguise. I found Kreemtex and have begun using it as a replacement for the Holden's brand. Kreemtex has an even higher solids content than Holden's. Translation: I can work faster and won't need as many coats to build the needed thickness. Now I can honestly say that finishing the mold making phase of this lovable monster project should proceed more smoothly. Like the difference between cream vs. half and half.
|
Joyce JacksonMultimedia artist in clay, paint, and jewelry. Part-time online bookseller. Archives
November 2018
Categories
All
|

 RSS Feed
